Jun 29, 2016

Jun 27, 2016

Jun 24, 2016
Sometimes, I just want a donut. I just can't have them. Until Emily von Euw came along with This Rawsome Vegan LIfe
And now, I have donut holes in my life. You can go to Em's site and check out her wonderful pictures and all that of her Raw Vegan Donut Holes
What You Need
2 cup rolled oats
2 cups cashews (1 cup impatiently soaked for 3 hours)
2 cups pitted Medjool dates
1/2 cup oat flour
5 drops Liquid Stevia Vanilla Crème
Salt. . .whatever.
Glaze:
4 tablespoons coconut oil
4 tablespoons maple syrup
3 drops Liquid Stevia Vanilla Crème
1 teaspoon salt
What You Do
Put everything but the glaze into a food processor or blender - I have a Cuisinart type one. I don't know what size or style. It's big. I put everything in there, hit "on" and moved about my business. It does a real good job if you are patient.
Once the stuff looks like dough - you take it out and roll it into balls. Smaller is better, I think. Not too small. Just normal small. They are dense so less is more here. You can't eat too many of these, let me tell you that!
In a small saucepan, I put in half the coconut oil and maple syrup and just heated it so the oil melted. It takes about 5 seconds. I added in the salt to the first batch. Then I rolled the balls around in there and popped them into the fridge to let the coconut oil set. After a couple commericals on TV, I did another 2 tablespoons of everything plus the Stevia, and rolled the balls again. I guess you can do this a couple times. . .I did it twice.
Then I ate! They are really good! More dense than "real" donut holes, but very sweet and cakey. I liked them, the hubs like them and some people at worked like them.

What does the fox say?
Yum, hum!

Jun 22, 2016

Jun 20, 2016
How has my writing been coming? Well, I completely a story in May - that would be "The Human Twist" while blogging everyday on Lyme. You can read those posts by going to my Lyme Files index like page thingy.
Well, I got a rejection letter. Hot dog!

I think I entered two "short-story" contests. My first story is about 10,000 words which makes it not eligible for most contests. I'll keep plugging away on the whole thing.
And this is how I do:
That's a total of 186,154 words so far. I don't know what that means in the writing industry. I'm still working in isolation with it. I had a couple people who I sent up to "The Stark Truth" to, but, little communication after that.
Sometimes, it's just nice to hear someone's thoughts both good and bad. And also to have someone help me with grammar.
I guess eventually, I will be sending this to be professional edited. I think I have. . .shoot. A lot more to go. I guess there are going to be 30 to 33 of these stories. Maybe I'm half way there. Yeah. That sounds good.
Well, I got a rejection letter. Hot dog!

I think I entered two "short-story" contests. My first story is about 10,000 words which makes it not eligible for most contests. I'll keep plugging away on the whole thing.
And this is how I do:
- The Calpurnia Mission: 9,298 words
- The Rebel Lion: 13,360 words
- Between Life and Dark: 12,480 words
- The Stark Truth 14,978 words
- Of Haves and Wants: 30,516 words
- Safe Harbor: 15,799 words
- Rebel Valley: 26,781 words
- Of the Best Intentions: 15,724 words
- Eight o' Clock: 19,395 words
- Underground: 17,944 words
- Salon des Refues: 15,338 words
- Into the Smoke: 12,273 words
- The Human Twist: 18,817 words
- Unknown: In progress, completion by June 30
That's a total of 186,154 words so far. I don't know what that means in the writing industry. I'm still working in isolation with it. I had a couple people who I sent up to "The Stark Truth" to, but, little communication after that.
Sometimes, it's just nice to hear someone's thoughts both good and bad. And also to have someone help me with grammar.
I guess eventually, I will be sending this to be professional edited. I think I have. . .shoot. A lot more to go. I guess there are going to be 30 to 33 of these stories. Maybe I'm half way there. Yeah. That sounds good.
Jun 17, 2016
Steak. Flank steak. Maybe like. . .$5 for some cheap meat.
Time to turn it into something delicious.
What You Need
You will also need butcher's twine. Or. . .kitchen twine. Whatever.
What You Do
Assemble your stuff! I totally over-bought. I only needed one package of the steak (the other was actually too narrow to use for this) and I only used one package of sun-dried tomatoes and one pack of basil.

Then get our your steak and divide your sun-dried tomatoes between them. Or. .all over it. I had these four strips of steak.

Then add your basil. I cut them into sloppy ribbons. You can use a whole leaf.

BACON! - I had thick cut bacon, I used two strips. I cut each strip in half.

Let's get all tied up. . .

I thought it would do a really bad job with it. I did a pretty good job. I rolled them up pretty well and tied each roll in two places to keep 'em pretty secure. I ate anything that fell out.

I gently seared the meat. The steak was very thin, so. . .didn't take long.

Then I popped them in the oven at 350 for about 10 minutes. Again, if your meat is thicker, it might take longer. I also made fries. And asparagus.

Let's see how I did. I cut off the string and slices this stuff with a very, very sharp knife. Because most of my knives actually are dull - FANTASTIC!

I ate two, the hubs ate two - it was delcious!

This was actually a really cheap and quick meal with a nice flavor mix and presentation.
Time to turn it into something delicious.
What You Need
- Flank steak: You can get one large piece or anything that is broad.
- Basil: I used one package
- Sun-dried tomatoes: I used on package.
- Bacon (I used uncured applewood smoked bacon): I used two strips
You will also need butcher's twine. Or. . .kitchen twine. Whatever.
What You Do
Assemble your stuff! I totally over-bought. I only needed one package of the steak (the other was actually too narrow to use for this) and I only used one package of sun-dried tomatoes and one pack of basil.

Then get our your steak and divide your sun-dried tomatoes between them. Or. .all over it. I had these four strips of steak.

Then add your basil. I cut them into sloppy ribbons. You can use a whole leaf.

BACON! - I had thick cut bacon, I used two strips. I cut each strip in half.

Let's get all tied up. . .

I thought it would do a really bad job with it. I did a pretty good job. I rolled them up pretty well and tied each roll in two places to keep 'em pretty secure. I ate anything that fell out.

I gently seared the meat. The steak was very thin, so. . .didn't take long.

Then I popped them in the oven at 350 for about 10 minutes. Again, if your meat is thicker, it might take longer. I also made fries. And asparagus.

Let's see how I did. I cut off the string and slices this stuff with a very, very sharp knife. Because most of my knives actually are dull - FANTASTIC!

I ate two, the hubs ate two - it was delcious!

This was actually a really cheap and quick meal with a nice flavor mix and presentation.
Jun 15, 2016

Jun 13, 2016
Moving is expensive, man. Shoot. And now I need STUFF?! Instead of spending over $300 on some fancy headboards, I decided I was going to make one. And by "I" I mean "me and my husband."
"Husband and I" sorry, Mom.
Let's make a headboard!
The handsome hubby and I decided to give the headboard instructions from Chaney.
That’s an interesting name. Chaney.
Anyhow, she posted this shinnananage called How To Make an Upholstered Headboard {From a Curtain Panel}

And I picked it because it had real measurements. I know I never post amounts but. . .thanks Chaney!
This seems pretty easy. Some wood. Some board. Some foam. Some. . batting? WTF?
Step 1: Supplies!
We hit up Lowes for the:
It ended up the hardboard doesn't fit into my car so we bought belts and I held on to it on the roof as we zipped around town fearing the worse. We made it. Only one slightly meltdown. Otherwise, we got it home. Go us!
I ordered the Room Essentials™ Comfy Foam Mattress Topper form from Target $20.13
I order 6 yards Waverly Mini Muse Sage of fabric from Joann Fabric for $61.38. Why 6 yards? Because I read something on the Internet that that was how much I needed. I needed A LOT less. Pillows, anyone?
So - totally cost
Step 2: Assemble!
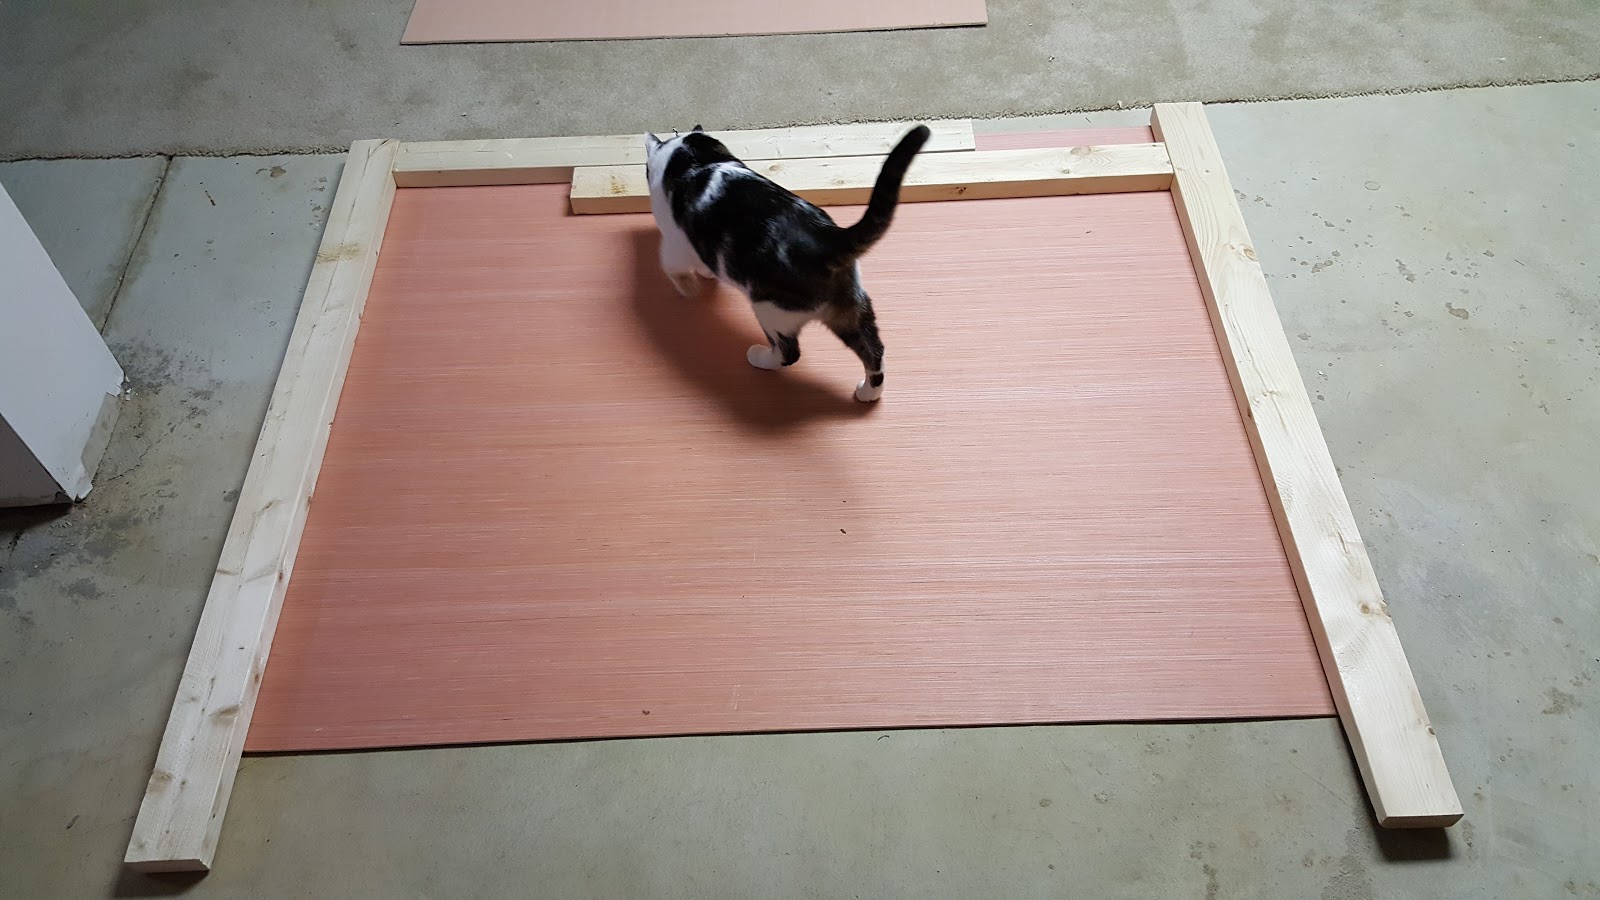
I can handle a hammer and nails so I went to our basement to assemble this headboard. Me and Mr. Lucky, the cat!
First, I laid out the wood. Lucky checked my work.

Yeah. . .something happened here. I am so bad with spacial stuff, I tried some other arrangements.

So, I guess something isn't right in the measurements from the website. I did get a tape measure and it seemed to all be right. . .I don't know how these wood pieces are suppose to work. Is my board too big?

Lucky's judgement was STRONG

Shut up, Cat! I'm working here! I followed the instructions to hammer the nail from the front of the headboard to the back.

Look at this fine nail job! I found these nails. They were longer than suggested, but, it was fine. The headboard will be sitting against a wall. Just need to make sure it doesn't fall apart.

By this time, my super-handsome husband came to help. He took one of the short boards and nailed it at the top of the headboard so we could nail the foam and fabric into it. The board is too thin to really hold up to much nailing.

So I hung out with the cat. We took selfies. . .

And judged the hubs. . .

And. .what was that sound?

So, the husband was done hammering stuff and we were ready to wrap stuff in foam. Once Lucky was done checking out stuff.

And being annoying. . .WE KNOW WHERE YOU ARE!

Ok, time to get to work! We laid the board on top of the foam and used spray adhesive and nails to secure it. The nails and glue worked really well! I tried to wrap the form symmetrically on both corners. I did not get any batting. .matting? Whatever that was. The foam was good enough, I think. I guess if we had the batting OVER the foam it would be smoother.
Oh. .OH. .that's why you do that. Haha.
Whatever, here's a picture of the gluing.

This was the fabric. Yes, it suppose to go up and down but it was too short. Bummer!

We decided we did not want a seam, so, we turned it sideways. I actually like this quirky take on this classic print! If you are going to get a fabric, it's probably best to get some that has a pattern that works in any direction. Unless you are REALLY good at cutting and matching up seams. As you might be able to tell from this post. and possibly this blog, I suck at most of these life skills.
Here is the hubs, hard at work! He has mad skillz!

Lucky was stalking a fly. . .so, we had some time.

Done and done! It was actually a pretty easy process. It could have been done by one person and really. . .it's an easy project!
We did not secure the fabric ALL around the headboard. It would hang fine without it - those most people on the Internet seem to run the foam and cloth around and secure it everywhere.
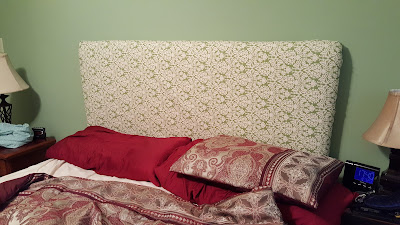
Here is the headboard in our room - we need new bedding. And have for a while. . .bought $60 worth of fabric, so . .soon.
Give this project a shot! It's pretty fun!
"Husband and I" sorry, Mom.
Let's make a headboard!
C: Is this a pintrest thing?
M: STFU
The handsome hubby and I decided to give the headboard instructions from Chaney.
That’s an interesting name. Chaney.
Anyhow, she posted this shinnananage called How To Make an Upholstered Headboard {From a Curtain Panel}
And I picked it because it had real measurements. I know I never post amounts but. . .thanks Chaney!
This seems pretty easy. Some wood. Some board. Some foam. Some. . batting? WTF?
Step 1: Supplies!
We hit up Lowes for the:
- Two 10' 2x4s cut down to four 54" lengths
- One 3/16" 48"x96" (4'x8') brown hardboard wall panel cut down to 48"x62"
Which came to $19.80.
It ended up the hardboard doesn't fit into my car so we bought belts and I held on to it on the roof as we zipped around town fearing the worse. We made it. Only one slightly meltdown. Otherwise, we got it home. Go us!
I ordered the Room Essentials™ Comfy Foam Mattress Topper form from Target $20.13
I order 6 yards Waverly Mini Muse Sage of fabric from Joann Fabric for $61.38. Why 6 yards? Because I read something on the Internet that that was how much I needed. I needed A LOT less. Pillows, anyone?
So - totally cost
- Wood: $19.80
- Foam: $20.13
- Fabric: $61.38 (Yeah, WAY to much fabric. I did get it 50% off, though)
- Total = $101.31
Step 2: Assemble!
I can handle a hammer and nails so I went to our basement to assemble this headboard. Me and Mr. Lucky, the cat!
First, I laid out the wood. Lucky checked my work.
Yeah. . .something happened here. I am so bad with spacial stuff, I tried some other arrangements.

So, I guess something isn't right in the measurements from the website. I did get a tape measure and it seemed to all be right. . .I don't know how these wood pieces are suppose to work. Is my board too big?

Lucky's judgement was STRONG

Shut up, Cat! I'm working here! I followed the instructions to hammer the nail from the front of the headboard to the back.

Look at this fine nail job! I found these nails. They were longer than suggested, but, it was fine. The headboard will be sitting against a wall. Just need to make sure it doesn't fall apart.

By this time, my super-handsome husband came to help. He took one of the short boards and nailed it at the top of the headboard so we could nail the foam and fabric into it. The board is too thin to really hold up to much nailing.

So I hung out with the cat. We took selfies. . .

And judged the hubs. . .

And. .what was that sound?

So, the husband was done hammering stuff and we were ready to wrap stuff in foam. Once Lucky was done checking out stuff.

And being annoying. . .WE KNOW WHERE YOU ARE!

Ok, time to get to work! We laid the board on top of the foam and used spray adhesive and nails to secure it. The nails and glue worked really well! I tried to wrap the form symmetrically on both corners. I did not get any batting. .matting? Whatever that was. The foam was good enough, I think. I guess if we had the batting OVER the foam it would be smoother.
Oh. .OH. .that's why you do that. Haha.
Whatever, here's a picture of the gluing.

This was the fabric. Yes, it suppose to go up and down but it was too short. Bummer!

We decided we did not want a seam, so, we turned it sideways. I actually like this quirky take on this classic print! If you are going to get a fabric, it's probably best to get some that has a pattern that works in any direction. Unless you are REALLY good at cutting and matching up seams. As you might be able to tell from this post. and possibly this blog, I suck at most of these life skills.
Here is the hubs, hard at work! He has mad skillz!

Lucky was stalking a fly. . .so, we had some time.

Done and done! It was actually a pretty easy process. It could have been done by one person and really. . .it's an easy project!
We did not secure the fabric ALL around the headboard. It would hang fine without it - those most people on the Internet seem to run the foam and cloth around and secure it everywhere.
Here is the headboard in our room - we need new bedding. And have for a while. . .bought $60 worth of fabric, so . .soon.

Give this project a shot! It's pretty fun!
Jun 10, 2016
Just a bunch of stuff and nom!
Spinach
Strawberry
Maple syrup
Buckwheat groat
Plus - couple slices of raw pumpkin and a banana.

Spinach
Strawberry
Maple syrup
Buckwheat groat
Plus - couple slices of raw pumpkin and a banana.

Jun 8, 2016

Jun 6, 2016
If you don’t know, I happen to love Pureology so hard. So hard. I have been using the Purify Shampoo and Precious Oils conditioner for almost two years. Ever since my hair-stylist told me to give it a try before my wedding so my hair would look good. I had a lot of hair. .I also didn’t rinse it well so there was a lot of junk in there and in my shampoo.


But, Pureology is expensive. I found even buying in bulk was (while more convenient) not cheaper.
 With much panic and maybe some tears, I started to research another, cheaper shampoo. And decided on OGX (I think you call it Organix, IDK) because people claimed it was a dub for Pureology. I had given the EverPure line from L'Oreala shot but I didn’t like the smell. And I don’t think it was great for my hair.
The major problem with finding something for my hair type. Most women seem to be into moisturizing. I wanted cleaning and then moisturizing.
 I settled on the Eucalyptus Mint shampoo because it. . .I don't know. .at some point through my tears of mistrust and hate in Wegmans it seemed cleanings. I hate mint. I don't know what happened. I panicked. The Internet only told me that moisturizing stuff matched Purelology and I don't use that. Just. . .it happened.
For conditioner - 'cause girlfriend needs a two-step process 100% of the time - I got the highly regarded Argan Oil of Morocco. I figured it was that on the coconut oil stuff. I have heard a lot of stuff about the Argan oil thing and how most of it that you buy is fake. In the dark depression of using the last of my Purelology - I was ok with that.
The First Day
Wash 1 - 'cause I wash my hair everyday. I know there's all this talk about how you should wash your hair once a year or once a week or something, I do NOT get that. I guess people use dry shampoo a lot? We all know when you don't wash your hair, people. We all know.
Anyhow, first two washes were ok. Then I had a breakdown because my hair was DISGUSTING. It was frizzy, tangled and horrible. I got the oil cap on the top of my head and the end of my hair looked super dry.
It smelled good, great.
Then I changed my conditioning technique. My shampoo game was strong
I adjusted what I was doing - I used MORE conditioner. It says to use a lot and leave it on for 3-5 minutes. Like I have that type of time in the shower. That led to it being an oily, matted mess.

Then I used less conditioner. That led to a hair wasteland.
*cry*
I was stuck with my choice - and a week into it I gave up on ever having nice hair again.
I found the best way to use the condition was to get a little more than I nromally use on my hand, wipe it in the middle/bottom of my hair and then use the exess on the top of my head then run my fingers down my hair like crazy. I do not wait 3-5 minutes. I do rinse SUPER well.
I'm over a week into using this stuff and. . .right now. Ok, it's not that bad. My hair is soft and smells good. It is NOT as tanglely as it was when I first used it.
We'll see how it goes. I'll report back when I am done with the bottles.


But, Pureology is expensive. I found even buying in bulk was (while more convenient) not cheaper.
With much panic and maybe some tears, I started to research another, cheaper shampoo. And decided on OGX (I think you call it Organix, IDK) because people claimed it was a dub for Pureology. I had given the EverPure line from L'Oreala shot but I didn’t like the smell. And I don’t think it was great for my hair.The major problem with finding something for my hair type. Most women seem to be into moisturizing. I wanted cleaning and then moisturizing.
I settled on the Eucalyptus Mint shampoo because it. . .I don't know. .at some point through my tears of mistrust and hate in Wegmans it seemed cleanings. I hate mint. I don't know what happened. I panicked. The Internet only told me that moisturizing stuff matched Purelology and I don't use that. Just. . .it happened.For conditioner - 'cause girlfriend needs a two-step process 100% of the time - I got the highly regarded Argan Oil of Morocco. I figured it was that on the coconut oil stuff. I have heard a lot of stuff about the Argan oil thing and how most of it that you buy is fake. In the dark depression of using the last of my Purelology - I was ok with that.
The First Day
Wash 1 - 'cause I wash my hair everyday. I know there's all this talk about how you should wash your hair once a year or once a week or something, I do NOT get that. I guess people use dry shampoo a lot? We all know when you don't wash your hair, people. We all know.
Anyhow, first two washes were ok. Then I had a breakdown because my hair was DISGUSTING. It was frizzy, tangled and horrible. I got the oil cap on the top of my head and the end of my hair looked super dry.
 |
| I'm really unhappy |
It smelled good, great.
Then I changed my conditioning technique. My shampoo game was strong

Then I used less conditioner. That led to a hair wasteland.
 |
| Straw. . .actually |
*cry*
I was stuck with my choice - and a week into it I gave up on ever having nice hair again.
I found the best way to use the condition was to get a little more than I nromally use on my hand, wipe it in the middle/bottom of my hair and then use the exess on the top of my head then run my fingers down my hair like crazy. I do not wait 3-5 minutes. I do rinse SUPER well.
I'm over a week into using this stuff and. . .right now. Ok, it's not that bad. My hair is soft and smells good. It is NOT as tanglely as it was when I first used it.
 |
| I take awful pictures |

Subscribe to:
Comments (Atom)


